Log cabin blocks are one of the most recognized blocks in quilting. Many different things can be accomplished with only log cabin blocks. I would encourage you to Google Log Cabin Block and study all the different quilts you can make with this simple block.
I would like to take a few minutes to help you get started on your own log cabin project.
These blocks I'm making are 12" finished blocks. I'm making them to go in a quilt with other 12" blocks.
You can make your log cabin block to finish whatever size you wish.
It is customary to make the center red or yellow. This center can match your log width or sometimes start with a larger center square. Again, there are many ways to make the blocks.
You can also make log cabin blocks with different size logs. The most common would be 2½" or 1½". I'm using 1½" blocks here because I like the look of the smaller logs. The blocks would obviously go together quicker using 2½" logs.
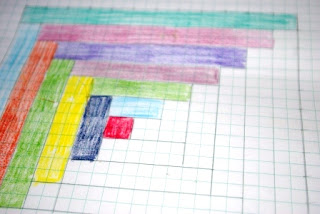
Before I started, I drew out my block to make sure that I would end up with exactly what I wanted. Have fun with it. You can draw and color just like when you were little...before everyone told you that you couldn't draw.
Step One: Start with 1½" white square and 1½" red square.

The next step is to add your first log. Here, I'm adding dark logs first, following my colored block. I'm working in a clock-wise manner.

Make sure that when your log goes one, the last log that you placed is away from you as in this picture.

Getting close to the end!

Ready to place the last log.

My "helper" was snoozing by the end of this project, lol.

That's a sketchy tutorial for a log cabin block. There is SO much information about how to put the finished blocks together, I wouldn't know where to begin. There are whole books about making log cabin blocks! I hope this will encourage you to try out this classic block.
I would like to take a few minutes to help you get started on your own log cabin project.
These blocks I'm making are 12" finished blocks. I'm making them to go in a quilt with other 12" blocks.
You can make your log cabin block to finish whatever size you wish.
It is customary to make the center red or yellow. This center can match your log width or sometimes start with a larger center square. Again, there are many ways to make the blocks.
You can also make log cabin blocks with different size logs. The most common would be 2½" or 1½". I'm using 1½" blocks here because I like the look of the smaller logs. The blocks would obviously go together quicker using 2½" logs.

Step One: Start with 1½" white square and 1½" red square.

The next step is to add your first log. Here, I'm adding dark logs first, following my colored block. I'm working in a clock-wise manner.

Make sure that when your log goes one, the last log that you placed is away from you as in this picture.

Getting close to the end!

Ready to place the last log.

My "helper" was snoozing by the end of this project, lol.

That's a sketchy tutorial for a log cabin block. There is SO much information about how to put the finished blocks together, I wouldn't know where to begin. There are whole books about making log cabin blocks! I hope this will encourage you to try out this classic block.
No comments:
Post a Comment